It was a Normal day of office when a sweet voice break the silence
“Hi Roy, How r u???”
She was my Functional Katherine J.
(Any way let me just skip our Private chat and let’s carry on with the work she gave)
She wanted to show a Demo of Adobe forms to the Client. For that she wants me to Develop a sample application
The Requirement was something like:
Develop a Webdynpro application from where user can download the PDF FORM in his/her local system. After filling the FORM, he/she can upload the FORM from the same application. This application should also have the option to fill the FORM ONLINE.
Prerequisite:
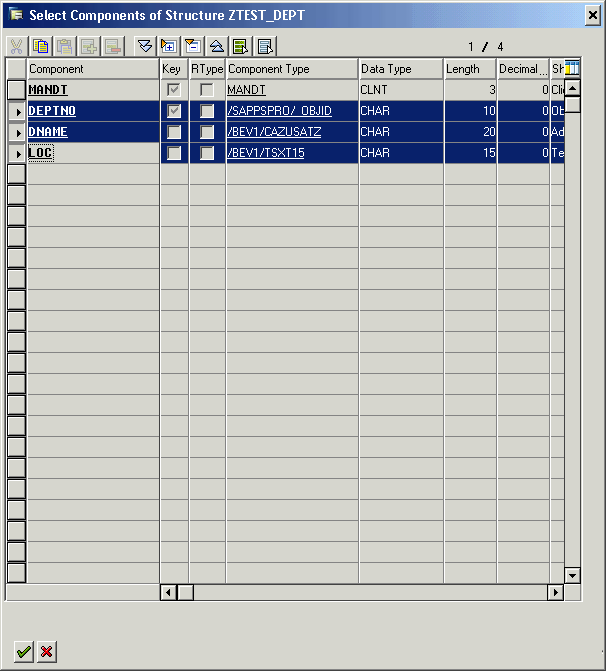
You need a database table in which you will store the FORM data. For that create a database table from Transaction code Se11 as shown below:
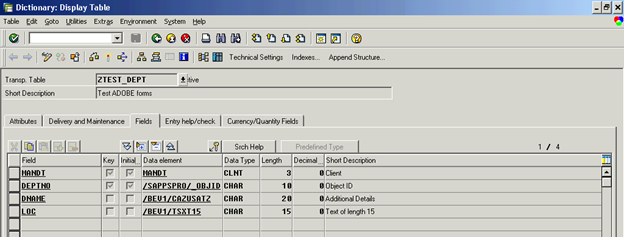
Table contains three fields (Other than MANDT) name :
DEPTNO, DNAME and LOC.
To start with the Tutorial:
Step 1:
Go to Transaction code SE80 and create a Webdynpro for ABAP component named as ZTEST_RAJ_OFFLINE .
(You can give any name J )
Step 2:
To create a PDF interactive form:
go to the Main view of your Webdynpro component and Right click on the ROOTUIELEMENTCONTAINER.Create a Interactive form named INT_DEPT_FORM.
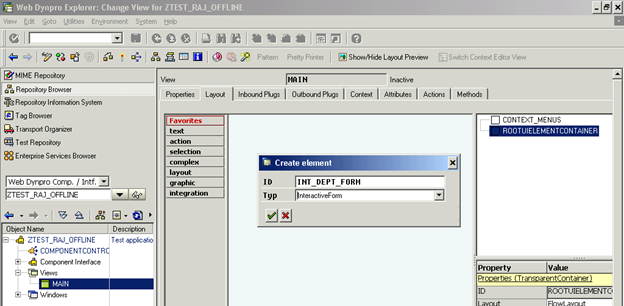
Step 3:
To also Allow katherine to upload the PDF Form from her locale System will create few more UI Elements like:
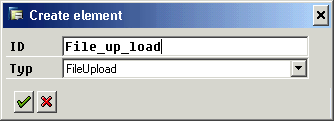
FILE_UP_LOAD which is of type FileUpload.
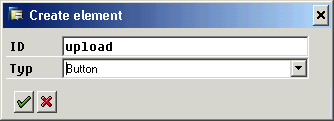
Upload (Button) which is of type Button.
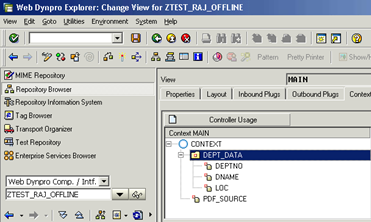
Step 4 : Now Go to Context tab of your Main view To create the required Nodes and elements.
When katherine upload the file from her local Computer, to read it we need to put it in side a element. So will declare a Element which is of type XSTRING.
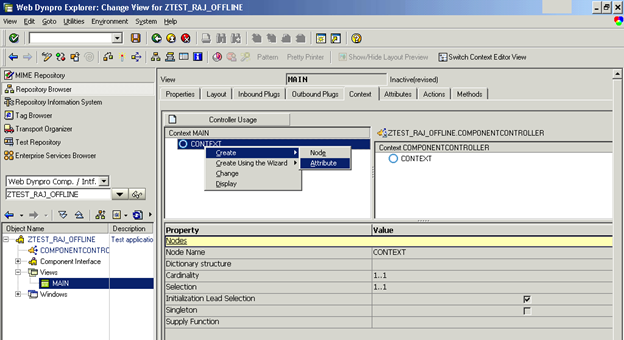
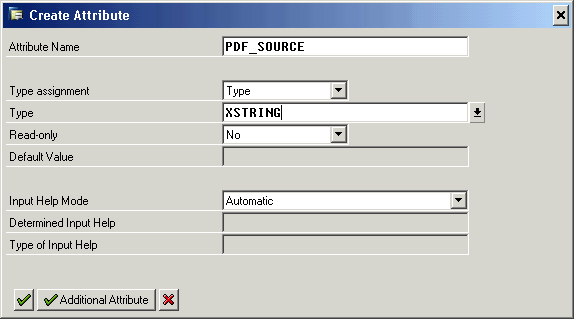
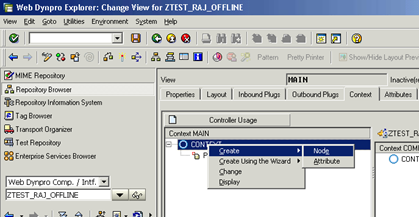
To Store the FORM data like Dept No, Dept name and location we also need A Node of which contains this information.
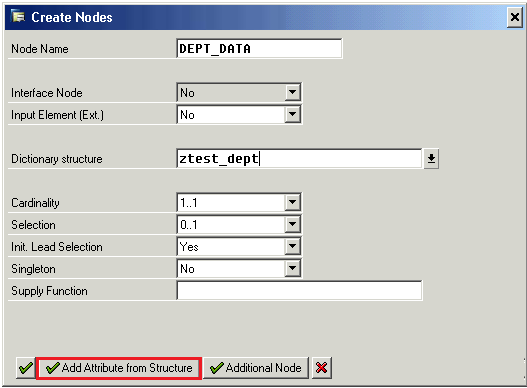
Finally your context will look like :
Step 5:
Now it’s time to map the data with layout.
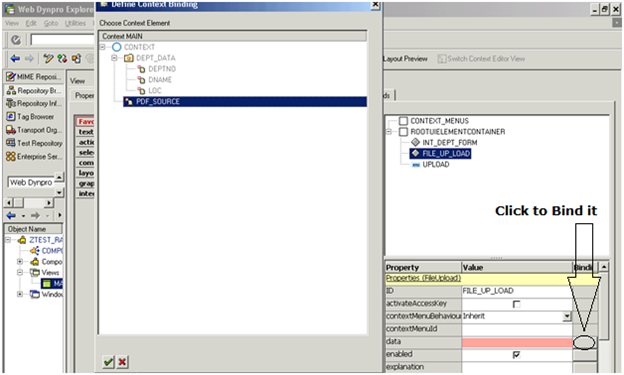
Go back to your layout tab.double click on the FILE_UP_LOAD Elements.
Go to Property data and Bind it with the PDF_SOURCE of your context.
Step 6:
Now Double click on the Element INT_DEPT_FORM.and enter the name ZINT_DEPTFORM in the Template source .Click Enter.
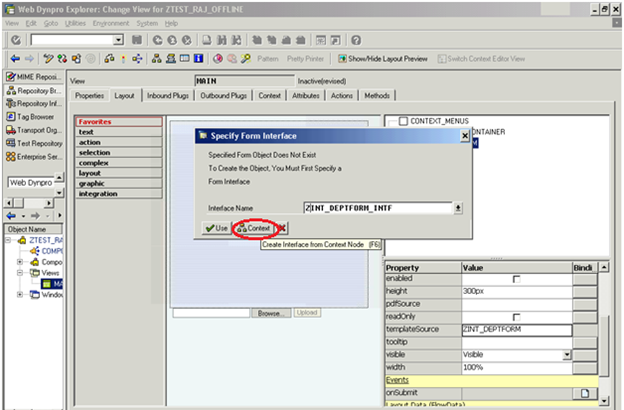
It will prompt you for Specifying the interface name. Give any name say : ZINT_DEPTFORM_INTF and click on the CONTEXT Button.
(it is good practice to use the context of your view because you need not to work extra on the interface part.)
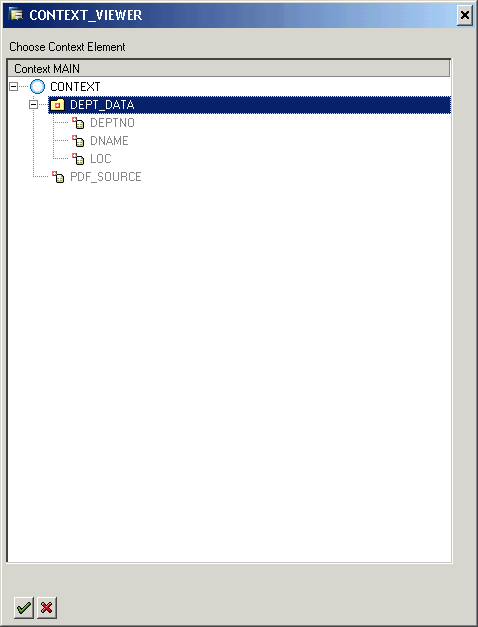
Select your Dept_data node and click enter.
Step 7:
It will open Adobe Form Designer.
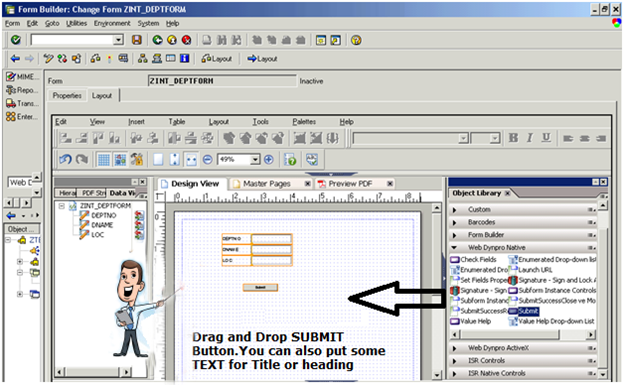
Select the data DATA View from the left panel where you can see yours Dept_data Node.
Drag it to the Right side part on design view. Work on the Alignment part.
Also put one Submit Button from the Object Library (Palettesà Object Library).From Webdynpro Native.
Finally your layout of adobe form will look like Below:
Step 8 : Go to the Property tab of the Form and select the layout type as
ZCI Layout (called as Zero client installation layout).
Again come back to the Layout tab and follow the menu path:
Utilities à Insert the Webdynpro Script .
Save and activate the FORM+interface.
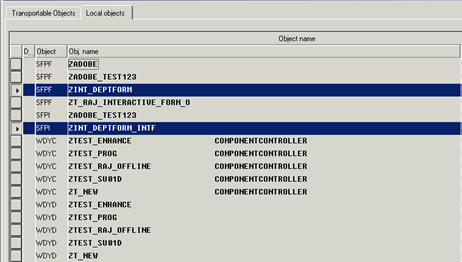
Step 9 : Go back to your Webdynpro Component:
2 things are remaining To complete the Required Development:
- Code to read and save the data from the FORM when user submit the form ONLINE.
- Code to read the PDF file when user upload it and save the data into database table ZTEST_DEPT.
Starting with the First part.
Go to the Properties section by double clicking on the Element INT_DEPT_FORM.and set the
Width as 100%
Check the Check box Active.
Step:10.
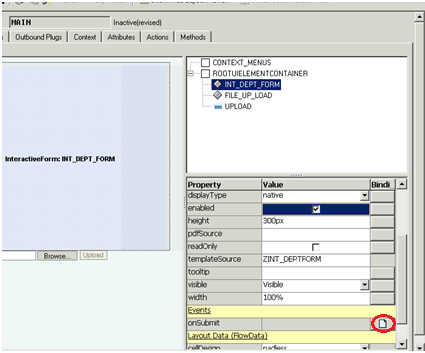
When User submit the FORM by clicking the SUBMIT Button in the FORM. It will trigger the Event. To trigger a method for this Event. just click on the Create Button for the OnSubmit Property of the INT_DEPT_FORM Element.
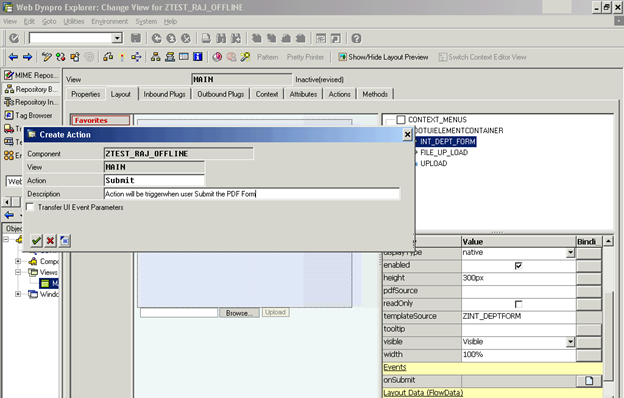
This Will Internally Generate a Method called ONACTIONSUBMIT.
(The naming convention is like ONACTION<Action name>.)You can see this method in the method tab of your Main View.
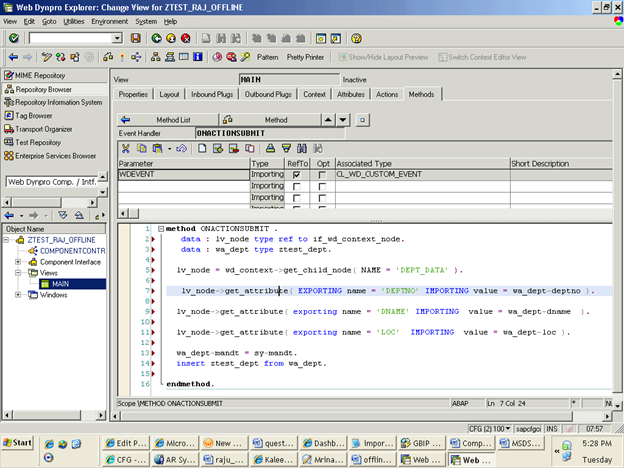
Put the below code inside the Method.
Explanation: when user fill the data inside the Form it will automatically seats in the Context of the Main view as it is mapped with the Adobe form Interface. So your job is to read that data and simply insert it into database.
data : lv_node type ref
to if_wd_context_node.
data : wa_dept type ztest_dept.
lv_node = wd_context->get_child_node( NAME = ‘DEPT_DATA’ ).
lv_node->get_attribute( EXPORTING name = ‘DEPTNO’
IMPORTING
value = wa_dept-deptno ).
lv_node->get_attribute( exporting name = ‘DNAME’
IMPORTING
value = wa_dept-dname ).
lv_node->get_attribute( exporting name = ‘LOC’
IMPORTING
value = wa_dept-loc ).
wa_dept-mandt = sy-mandt.
insert ztest_dept from wa_dept.
Step 11:
When user upload the file code should be there to read the data from the file and save it into database table ZTEST_DEPT.
Double click on the Upload Button element. Go to its Properties and click on the Create Icon to create an Action.
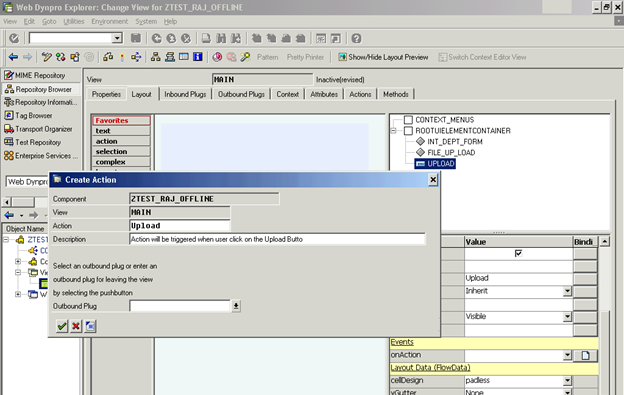
Same way as Submit this will also Create one method named ONACTIONUPLOAD.Put the Below code inside that Method:
Explanation: This code reads the PDF file which is Uploaded by the user and extract the Dept name , Dept No and location from it and save it into the database table Ztest_dept.
TYPE-POOLS: ixml.
DATA: w_pdf_source TYPE xstring,
w_dob TYPE char10.
* Get a reference to the form Processing class
DATA lo_el_context TYPE REF TO if_wd_context_element.
DATA ls_context TYPE wd_this->element_context.
DATA lv_pdf_source LIKE ls_context-pdf_source.
* get element via lead selection
lo_el_context = wd_context->get_element( ).
* get single attribute
lo_el_context->get_attribute(
EXPORTING name = `PDF_SOURCE`
IMPORTING value = lv_pdf_source ).
DATA: l_fp TYPE REF TO if_fp.
l_fp = cl_fp=>get_reference( ).
* Get reference to the Pdf Object Class
DATA:l_pdfobj TYPE REF
TO if_fp_pdf_object.
TRY.
l_pdfobj = l_fp->create_pdf_object( ).
CATCH cx_fp_runtime_internal.
CATCH cx_fp_runtime_usage.
CATCH cx_fp_runtime_system.
ENDTRY.
* Set your Pdf In the Pdf object created
TRY .
l_pdfobj->set_document( pdfdata = lv_pdf_source ).
* Extract data from pdf object
l_pdfobj->set_extractdata( ).
CATCH cx_fp_runtime_usage.
ENDTRY.
TRY.
* Call Adobe Document Service
l_pdfobj->execute( ).
CATCH cx_fp_runtime_usage.
CATCH cx_fp_runtime_system.
CATCH cx_fp_runtime_internal.
ENDTRY.
* Get the pdf Data to a Xstring Variable
DATA: pdf_form_data TYPE xstring.
l_pdfobj->get_data( IMPORTING formdata = pdf_form_data ).
* Call method to convert xstring to string.
DATA: converter TYPE REF TO cl_abap_conv_in_ce,
formxml TYPE string.
converter = cl_abap_conv_in_ce=>create( input = pdf_form_data ).
converter->read( IMPORTING
data = formxml ).
* Get the ixm type group Into Our prorgram
DATA: l_ixml TYPE REF TO if_ixml.
l_ixml = cl_ixml=>create( ).
* Get istream Object from Stream Factory
DATA: streamfactory TYPE REF TO if_ixml_stream_factory,
istream TYPE REF TO if_ixml_istream.
streamfactory = l_ixml->create_stream_factory( ).
istream = streamfactory->create_istream_string( formxml ).
* Get xml document Class to process XML
DATA: document TYPE REF TO if_ixml_document.
document = l_ixml->create_document( ).
* Get an Interface to Parse the XML
DATA: parser TYPE REF TO if_ixml_parser.
parser = l_ixml->create_parser( stream_factory = streamfactory
istream = istream
document = document ).
* Start parsing theDocument with parsing interface referenced.
parser->parse( ).
DATA: node TYPE REF TO if_ixml_node,
fs_dept TYPE ZTEST_DEPT.
node = document->find_from_name(‘DEPTNO’).
IF node IS NOT INITIAL.
fs_dept-DEPTNO = node->get_value( ).
ENDIF.
node = document->find_from_name(‘DNAME’).
IF node IS NOT INITIAL.
fs_dept-DNAME = node->get_value( ).
ENDIF.
node = document->find_from_name(‘LOC’).
IF node IS NOT INITIAL.
fs_dept-LOC = node->get_value( ).
ENDIF.
IF fs_dept IS NOT INITIAL.
fs_dept-mandt = sy-mandt.
INSERT into ztest_dept VALUES fs_dept.
ENDIF.
Step 12:
- Save and activate your wendynpro component.
- Create a Webdynpro application.
- Call your beautiful User Katherine to test this functionality.
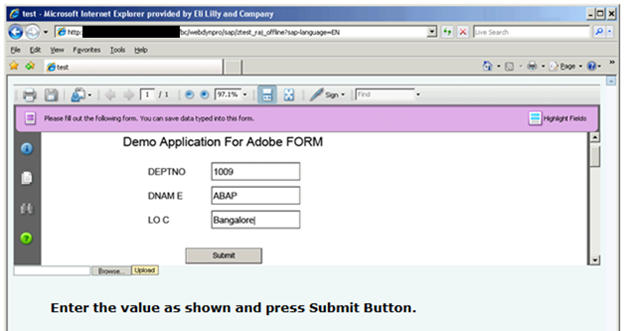
You should see the Below Screen.
(Note : if you can’t see the Adobe forms just “change your advance internet setting to default” from internet options)
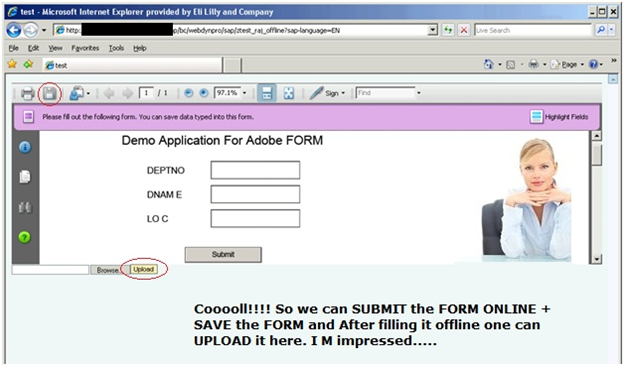
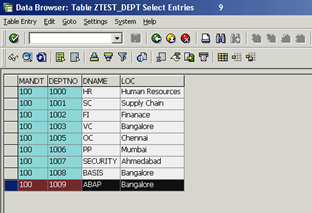
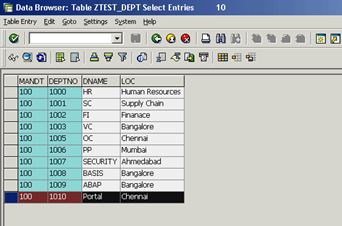
You should see the one entry created in the ZTEST_DEPT table via SE16.
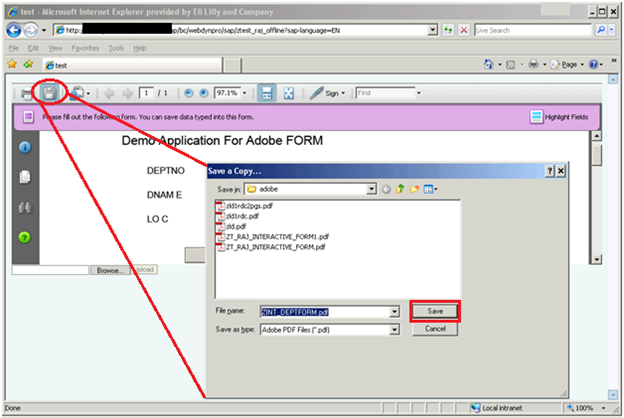
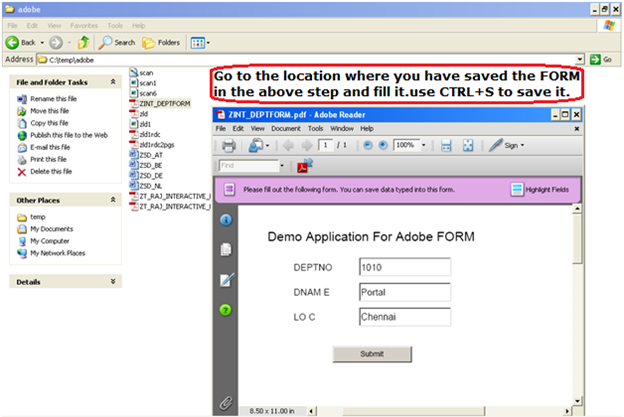
This is what ADOBE FORM has delivered out off the BOX functionality. You can’t achieve this using any HTML Forms. Just like a normal word or excel file it will store the data which you have filled.
Execute your application again and upload this form.
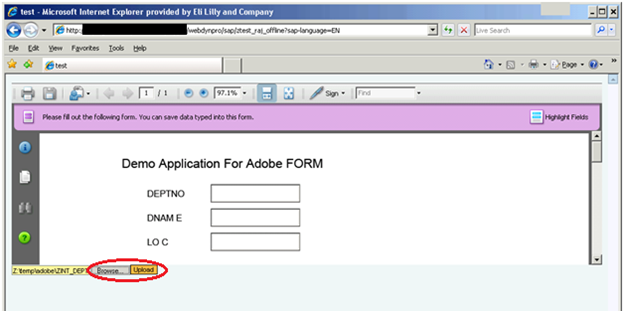
Once you click on the UPLOAD Button you can see that entry reflected in the ZTEST_DEPT table.
Note : if something is not working out you can put the debugging point inside your onactionsubmit / onactionupload method.

